Our belongings had been in storage for quite some time when we traded one location for another. The unpacking was slower than slow as we adjusted to our new downsized surroundings, overcame a few hurdles and continued to store one thing or another in the garage while renovations were under way:
Fast forward one year, and plans to make use of the one full wall in our otherwise open-plan house were under way:

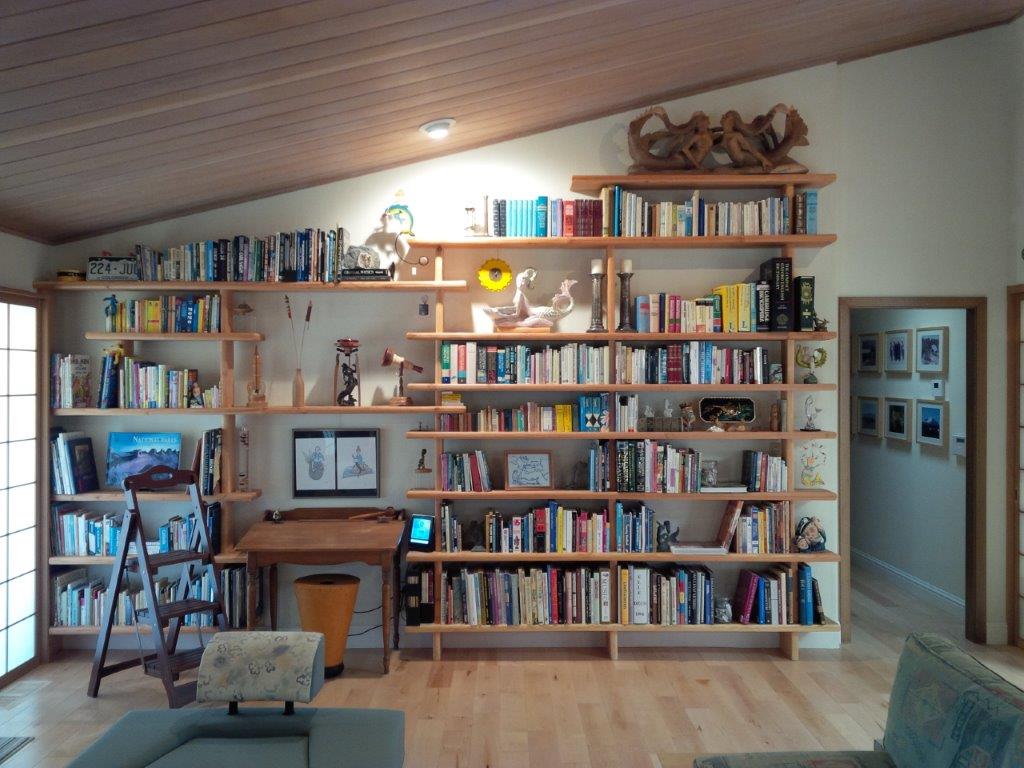
We had boxes upon unopened boxes of books and belongings stacked along that one remaining usable wall – books that could only be housed with a large and sturdy shelving solution.

From paper to wall, let’s see what a 2×4 (a 240 cm long plank measuring 5cm x 10cm thick) shelf would look like.
Due to the height and width of that wall, we were going to need a lot of wood. (Much more than I was accustomed to using for my miniatures, as you can see from the little selection on the right!) So we opted to buy 2″ (5 cm thick) construction lumber, which, at a fraction of the cost of kiln-dried, furniture-grade fir, made financial sense for the 136 ft (41.5 m) load.
A trip to the local lumberyard for lots of 8′ (240 cm) long planks in widths of 6″ (15 cm), 10″ (25 cm) and 12″ (30 cm), and by the time we were unloading the wood back home we saw the catch:


Dripping resin is a disaster for books: these shelves would have to be cured!
Duct tape and cardboard called upon for a home-made kiln: long enough to take the 8′ planks, the cardboard enclosure is lined with black plastic (bin liners) to take advantage of the full summer sunshine. Those sticks of wood for spacing are called ‘stickers’ in the trade.

Cooking the lumber at 160°F (71°C) for a few hours should cure the sap, but for good measure I jigged up some mirrors and aluminum foil to direct as much heat as possible into the wood, with an oven thermometer on hand to check for done-ness:

The following day all the shelves and supports had to be cut to size and the edges routed. No, those aren’t dominoes, although the occasional gust of wind played anyway! Two coats of shellac applied to seal the wood, then three coats of clear polyurethane, with light sanding in-between, and all in a well-ventilated place, just as the instructions state:


The wood was left to dry for a few days before construction could begin, then the shelves themselves could be bolted to the wall for stability with the uprights taking the weight. I put the heavy boxes on the bottom shelf to take out any flexing of the floor boards. Sticky notes on the wall show where I had located the wall studs.


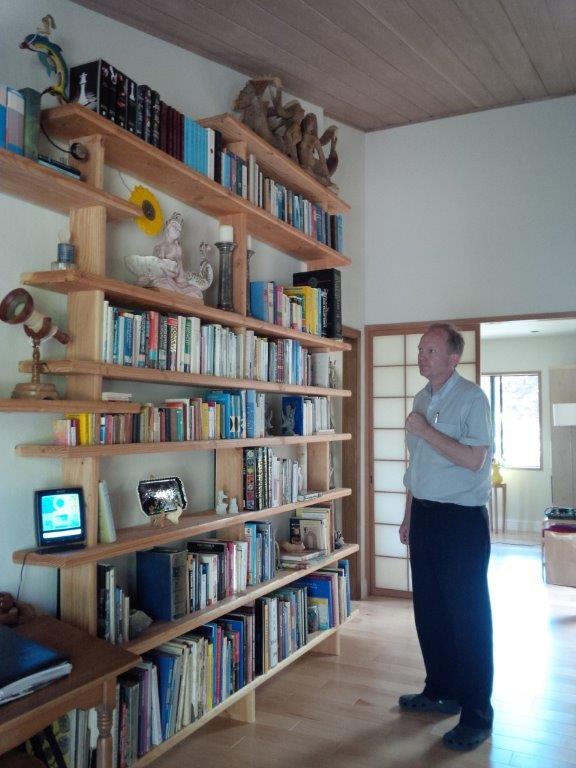
The bottom shelves are wider, for the bigger books, and get narrower higher up. Time for a ladder as the height continues to increase. It’s finally starting to look like a piece of furniture, and it is really tall.


Then comes the fun part: unpacking those boxes, rediscovering treasures, sorting and assembling and…
…oh, I haven’t read this one in a while…

Dat is weer een mooi stuk bouwwerk. Dat staat vast prachtig in jullie huis.
Je vertelde vorig jaar dat er bouwplannen zijn die misschien je huis doorkruisen. Is dat nog aan de orde? Hoe dan ook, veel plezier in jullie mooie woning.
Groeten van hier,
And, came they did!
It’s beautiful work, Maarten! I love how there is enough room to display your other treasures!
Now, do you take orders? 🙂
Thanks, it took a while but worth it, and or course, you can order whatever you like, as long as it fits on a pin-head
Maarten, you are a wizard. Congratulations on finally unpacking. I know that is a celebration. I hope it feels like you can put down roots and start to feel at home!